
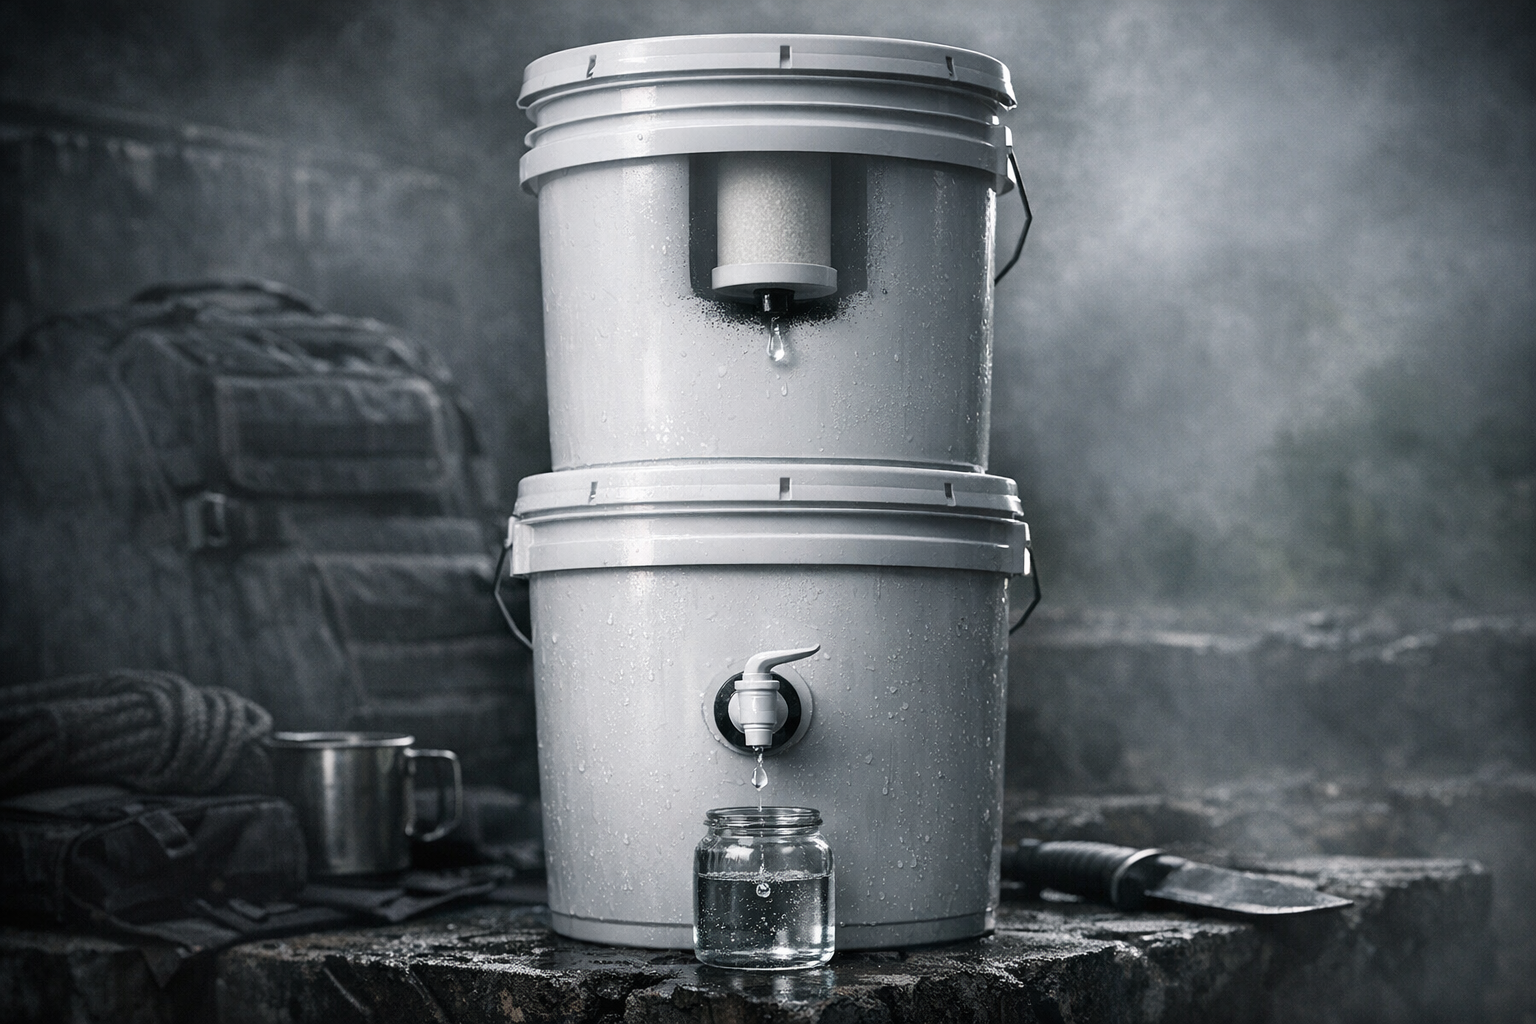
Building your own gravity-fed water filtration system is an easy and cost-effective way to ensure access to clean drinking water without relying on electricity or plumbing. This system uses two stacked containers and a ceramic filter to remove bacteria, protozoa, and contaminants like chlorine and heavy metals. It’s perfect for emergencies, off-grid living, or outdoor use. Here's a quick summary:
- Cost: $75–$100 (vs. $327+ for commercial units).
- Materials: Food-grade buckets, ceramic filter, spigot, washers.
- Tools: Drill, tape measure, reamer.
- Assembly Time: About 20 minutes.
- Output: 1 gallon/hour with a single filter, expandable for higher flow.
The guide includes step-by-step instructions, maintenance tips, and ways to improve performance, such as adding extra filters or pre-filtration. This DIY system ensures safe, drinkable water while saving money and providing flexibility for various needs.
@figure 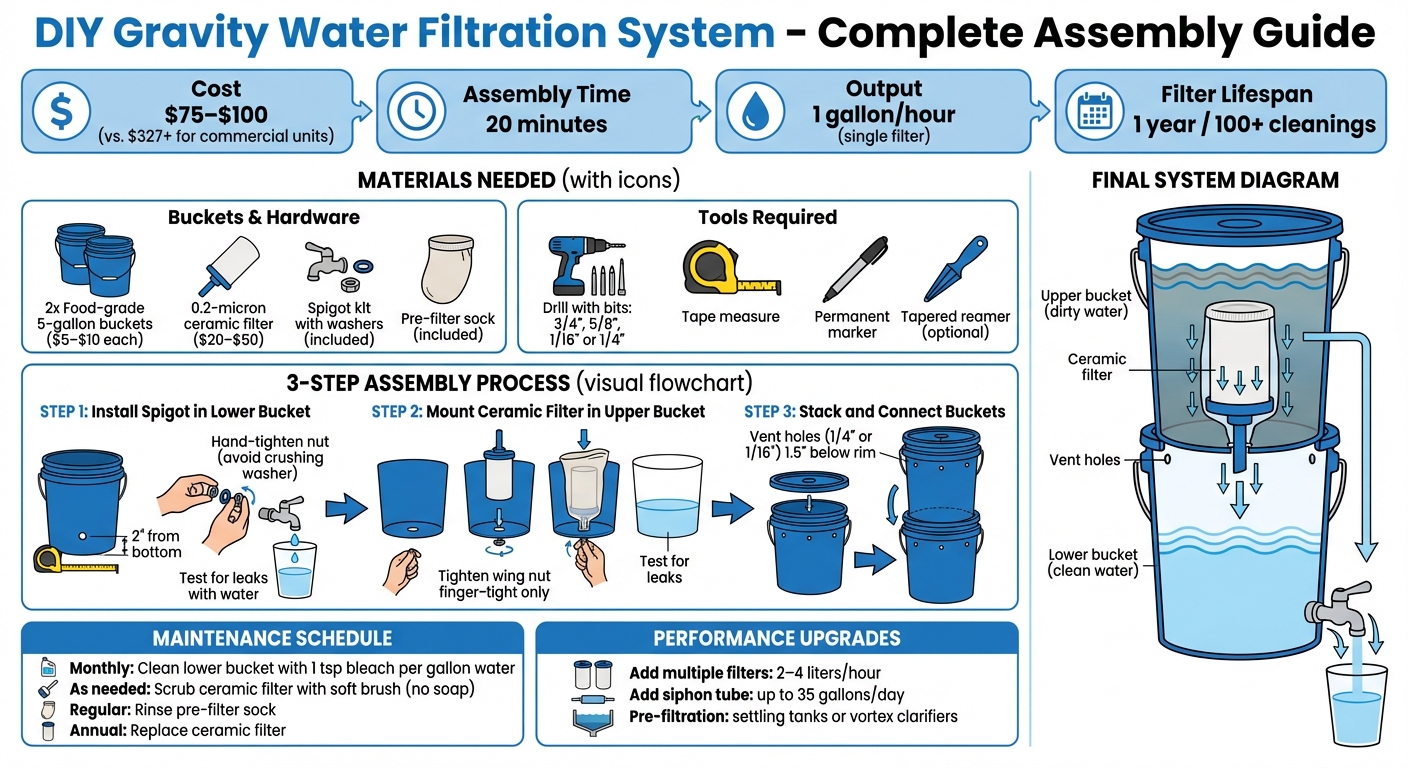 {DIY Gravity Water Filter Assembly: 3-Step Process with Materials and Tools}
DIY Gravity-Fed Water Filter | Building Guide
Materials and Tools Needed
Before diving into the assembly process, make sure you have all the necessary materials and tools on hand. The entire setup can be completed in about 20 minutes. Most of the required items can be found at hardware stores like Home Depot or Lowe's, while specific filter components are readily available online.
Materials List
You'll need two food-grade 5-gallon buckets [11, 14]. These are essential to avoid any risk of chemical contamination. For the filtration system, a 0.2-micron ceramic candle filter with activated charcoal and silver impregnation is a must-have. These filters are typically sold in kits that cost around $50 and often include a spigot and the necessary hardware. Make sure the kit also contains food-grade rubber or silicone washers to ensure watertight seals at all connection points. Some kits even include a microfiber pre-filter sock that fits over the ceramic filter to catch larger debris, extending the life of the filter [11, 14]. For bucket lids, screw-on versions like Gamma Seals provide a better, more secure fit compared to snap-on lids.
| Component | Specification | Typical Cost | Where to Buy |
|---|---|---|---|
| 5-Gallon Buckets | Food-grade HDPE plastic (2) | $5–$10 each | Home Depot, Lowe's, Walmart |
| Ceramic Filter | 0.2-micron, silver-impregnated | $20–$50 | Amazon, Just Water, REI |
| Spigot Kit | Plastic or stainless steel with washers | Included in filter kit | Amazon, Just Water |
| Pre-filter Sock | Microfiber or mesh | Included in filter kit | Included with filter |
Tools Required
To assemble the system, you'll need a drill to create holes for the spigot and filter [11, 15]. Use the following drill bit sizes:
- 3/4-inch bit for the spigot hole
- 5/8-inch bit for the ceramic filter stem
- 1/16-inch or 1/4-inch bit for air vent holes [11, 14]
The air vent holes are essential to prevent a vacuum from forming, which would otherwise stop the water flow. A tape measure and a permanent marker (like a Sharpie) are helpful for marking precise, centered spots for drilling. When drilling the spigot hole, position it at least 2 inches from the bottom of the bucket to allow room for the internal nut and ensure the bucket remains stable [15, 14].
For thin plastic materials, a tapered reamer is a better choice than a standard twist drill for creating larger holes. It minimizes tearing and ensures cleaner, burr-free edges. As AndrewG166 explains:
"Drilling large diameter holes in thin material is best not done with a twist drill... a tapered reamer, which is ideal".
With these materials and tools prepared, you're ready to start assembling the system in the next steps.
Step-by-Step Assembly Instructions
Now that you’ve got all your materials and tools ready, it’s time to assemble your gravity water filtration system. Pay close attention to the details during this process - leaks can compromise the safety of your clean water supply.
Step 1: Installing the Spigot in the Lower Bucket
Start by drilling a 3/4-inch hole about 2 inches above the bottom edge of the lower bucket. This height ensures the spigot stays clear of countertops or floors when the bucket is in use. Once the hole is drilled, smooth out any plastic burrs to create a clean surface for sealing.
Slide one rubber washer onto the spigot stem and insert the spigot through the hole from the outside of the bucket. Place the second washer on the inside, then secure it with the provided nut, tightening it by hand. Be cautious during this step. As survival expert J. Wayne Fears warns:
"Caution should be used to avoid overtightening the nut and crushing the washer, resulting in a leak."
If the washers have beveled edges, ensure they face the hole on both sides to create the best seal. After assembly, fill the bucket with clean water to test for leaks.
Step 2: Mounting the Ceramic Filter in the Upper Bucket
Drill a 5/8-inch hole in the center of the upper bucket’s bottom. Check that the hole is free of burrs before proceeding. Handle the ceramic filter carefully, gripping only its base to avoid damage.
Place one rubber washer onto the filter’s threaded stem and insert the stem through the hole from inside the bucket. On the outside, add the second washer and secure it with the wing nut, tightening it just until finger-tight. As J. Wayne Fears advises:
"Turn the wing nut until finger-tight; be careful not to over tighten."
If your kit includes a microfiber pre-filter sock, now’s the time to slip it over the ceramic filter. This sock helps trap larger particles and extends the filter’s lifespan. Add a small amount of clean water to the upper bucket to confirm there are no leaks around the filter stem. Once you’re sure everything is secure, you’re ready to connect the buckets.
Step 3: Stacking and Connecting the Buckets
With the spigot and ceramic filter in place, it’s time to assemble the system. Drill a 5/8-inch hole in the center of the lower bucket’s lid, aligning it with the hole in the upper bucket’s bottom. The ceramic filter’s stem will pass through both holes, locking the buckets together.
Before stacking, drill small vent holes (1/4-inch or 1/16-inch) about 1.5 inches below the top rim of each bucket. These vents are essential to prevent a vacuum from forming as water drains. Without them, the filtering process could stop entirely. As J. Wayne Fears explains:
"A vacuum would be formed if the holes were not there, which would stop the filtering action, and you would not be able to drain the bottom bucket."
Place the upper bucket on top of the lower one, ensuring the filter stem passes through both holes. A single ceramic filter typically produces about 1 gallon of clean water per hour. If you need more output, consider adding a siphon tube to the filter stem, which can increase production to as much as 35 gallons per day.
sbb-itb-1666494
Testing and Maintaining Your System
Initial Testing Procedures
Start by filling the upper bucket and carefully checking all seals for any leaks. If you spot any drips around the seals, tighten the wing nuts or hex nuts by hand. Be cautious not to overtighten, as this could damage the washers.
If your system includes a pre-filter sock, gently squeeze it to release any trapped air. Air bubbles can cause the sock to float, which might block water flow. Also, make sure to discard the first four to five batches of water. This step helps flush out any manufacturing dust or carbon fines that may be present.
During these initial runs, keep an eye on the flow rate. A typical ceramic filter should produce around 1 gallon of water per hour. You’ll notice that the output improves over the first couple of days as the filter media becomes fully saturated.
Once you’ve confirmed there are no leaks and the flow rate is consistent, you’re ready to move on to regular maintenance.
Regular Cleaning and Maintenance
Routine upkeep is key to keeping your system running smoothly and ensuring clean water. Every month, clean the lower bucket using a solution made with 1 teaspoon of unscented bleach per gallon of water. Let it sit for five minutes, then rinse thoroughly with filtered water.
If you notice the flow rate slowing down or see sediment building up on the ceramic filter, it’s time to clean it. Use a soft brush or a slightly abrasive cloth to scrub the filter. Avoid using soap, as it can clog the filter’s pores and cause damage.
Be sure to protect your ceramic filter from freezing. If it freezes while wet, the expanding ice can crack the filter element, rendering it ineffective. Additionally, rinse the pre-filter sock regularly with clean water to stop large particles from reaching the ceramic filter.
For long-term tracking, use a permanent marker to note the installation date on the bucket. Ceramic filters generally last about one year with regular use and can be cleaned over 100 times before they need to be replaced.
Improving System Performance
Once your system is assembled and properly maintained, you can take a few extra steps to boost its performance. While your basic gravity filter provides reliable filtration, these upgrades can help you handle higher water demands with ease.
Adding Multiple Filters for Better Flow Rate
A single ceramic filter processes less than 1 gallon of water per hour, which might not cut it for larger households. To address this, you can install multiple filter elements in parallel. This setup increases the flow rate to around 2–4 liters per hour, shares the workload between filters, and reduces how often you need to clean them. For off-grid cabins or larger households, consider designing your system to accommodate several filter elements. Another option is to attach a siphon tube to the filter stem, which can boost output significantly - up to 35 gallons per day.
Expanding Water Security with AgentXSurvival Solutions

Upgrading your hardware is just one part of the equation. Expanding your water security strategy is equally important. Your DIY gravity filter is most effective when combined with other off-grid water solutions. For example, AgentXSurvival offers the Aqua Tower, a DIY water generator that works without power. This system extracts moisture from the air, providing a reliable backup source when natural water supplies are unavailable or contaminated.
The Aqua Tower pairs perfectly with your gravity filter, as each system is suited to different scenarios. Use the gravity filter to clean collected rainwater or stream water, while the Aqua Tower steps in when those sources run dry. Both systems are power-free and come with easy-to-follow instructions, making them beginner-friendly. For even better performance, consider adding pre-treatment methods like settling tanks or vortex clarifiers to remove bulk sediment. These steps protect your ceramic filters from clogging too quickly and help maintain a steady flow rate.
Conclusion
Creating your own gravity water filtration system for just $75–$100 gives you access to clean, drinkable water without relying on electricity or complicated plumbing. It's a practical solution for off-grid living, emergency preparedness, or remote locations where clean water might not always be available.
Beyond the practical benefits, assembling the system sharpens your problem-solving skills. As Stephen Mullaney wisely states:
"Your gear will fail you... the more familiar you are with its inner workings, the more likely you'll overcome challenges."
Understanding how the filtration process works not only helps you troubleshoot issues but also ensures you're ready to handle repairs when they matter most.
This multi-stage system is highly effective, removing over 99% of microscopic pathogens. To keep the system working at its best, regular maintenance is key - clean the chambers and filters weekly. And as an added layer of safety, always boil the filtered water for one minute before drinking. These simple steps make your system more reliable and ensure long-term water safety.
To extend the system's efficiency, consider pairing it with a pre-filtration method, like a bandana or coffee filter, to protect the main filters. Adding extra filter units can also increase the flow rate to 2–4 liters per hour. If you're in a situation without natural water sources, you might explore complementary systems, such as the Aqua Tower from AgentXSurvival, which can extract moisture from the air without relying on power.
FAQs
To keep your gravity-fed water filtration system leak-free, start by choosing a food-grade container with well-threaded connections. For all threaded joints, apply Teflon tape - wrap it snugly around the threads 2–3 times before attaching the fittings. Pay close attention to any O-rings or gaskets; replace any that are worn or damaged, and make sure they sit evenly during assembly.
When securing connections, don’t over-tighten, as this can damage the threads. After assembly, fill the tank and check for any drips while the system is under pressure. If you notice leaks, adjust the fittings slightly and retest. To maintain the system, clean the tank regularly to prevent algae growth, which can weaken seals. Also, make sure the system is on a stable platform to minimize movement that might loosen connections. These steps will help ensure your filtration system stays dependable and leak-free.
To keep your DIY gravity water filtration system working effectively, regular upkeep is a must. Start by flushing the system with clean water before its first use and after any extended storage. This step helps clear out any dust or debris that might block the filter.
Make it a habit to clean the components regularly, especially if you’re in a dusty or muddy area. At least once a month, take the system apart and wash the housing and tubing with warm, soapy water. Use a soft brush to scrub away any buildup, rinse everything thoroughly, and let all parts air-dry completely before putting it back together.
When the filter isn’t in use, store it in a dry place away from direct sunlight to avoid mold growth. For longer storage periods, keep it in a clean, sealed container. Additionally, keep an eye on the filter’s lifespan and follow the manufacturer’s guidelines for replacing the filter element. If you notice a slower flow rate or an odd taste in the water, it’s probably time for a new filter.
For more survival tips and resources on off-grid water systems, visit AgentXSurvival.
To get better flow from your gravity-fed water filter, try a few simple tweaks. Start by raising the water reservoir to create more pressure - height makes a difference here. Make sure the hose is straight and free from any bends or kinks that could slow things down. Also, check for trapped air in the system and remove it to keep things running smoothly. Regular cleaning or backwashing of the filter is another key step to ensure it performs at its best. These straightforward adjustments can significantly improve how efficiently your system works.